

How To Draw An Art Pallet Step By Step
How to Draw a Marble
Acquire how to depict a marble in this gratis cartoon lesson!

In this cartoon art lesson, I'll walk you through step-past-step instructions on how to create a realistic cartoon of a marble in colored pencils,
Marbles are fun subjects to paint and draw. (If you lot expect on my photorealism art folio, you'll see that I dearest to draw and paint marbles!) The translucency and brilliance of these tiny, shiny objects are alluring as the light shines through them and creates interesting reflections. Plus, when drawing marbles you get to work with a lovely balance of sharp details along with relatively wider areas of color.
Since marbles are quite small, they work well for an introductory Photorealism Cartoon Lesson that will assistance you prepare to draw larger, more detailed things. In this gratis art lesson, you'll learn how to:
-
Brand your ain transfer paper
-
Transfer an prototype to create a photorealistic colored pencil drawing
-
Build and blend layers of colored pencils to create a sense of depth and realism
-
Reach a sense of luminosity and translucency with colored pencils
Here is an animation that shows all the steps involved in creating this realistic drawing of a marble:
Allow's begin!
Here are the cartoon supplies you will demand for this free realistic drawing art lesson:

I've provided links below to the relevant products so that you can easily detect them on Blick Fine art Materials, my favorite online art supplier. I'm a member of Blick'south affiliate plan, which means if y'all brand a buy after clicking on one of these links, I'll receive a minor committee (at no extra price to you lot). Your buy helps back up this site and keeps it free of ads. Click hither for more than info.
- Paper – I used Strathmore 400 Serial drawing paper. The texture and weight of this paper are perfect for drawing with colored pencils – and it is acid-free.
- Cartoon Board – I utilise a Hardboard Panel equally a drawing board, considering they are perfectly polish, sturdy, and very cheap.
- Tape – You'll need tape to adhere the drawing newspaper to the drawing lath, and besides to stick the print-out to the board for the kickoff few cartoon steps. As you can see from the photos, I used regular old Scotch tape. Now, this will be a instance of "Do as I say and not as I do", because using regular Scotch tape is a big no-no if conservation and longevity are important to y'all. Yous really should use artist record (similar to painter'southward tape) to adhere your drawings to your cartoon lath, because regular Scotch tape is total of acids that volition plow your drawing yellow over time. Masking tape volition have the same upshot, so stay away from masking record too. An artist tape, on the other hand, volition not cause yellowing – plus it's normally easy to remove and leaves behind no residue. But, since the record will just exist touching the cartoon for a few hours in this instance, and since I don't have any artist tape on hand, I'll let it slide… but only this time!
- 2B pencil – I used a sharp 2B pencil to trace the drawing. You lot tin can too employ a mechanical pencil for this, which is actually preferable because it retains a sharp point.
- 6B or 8B pencil – To make your own transfer newspaper, you'll demand a soft 6B or 8B pencil.
- Print-out of marble photo – Download the photograph below and print it out on regular printer paper. Make certain to apply regular printer newspaper and not something heavy like card stock.
- Scissors – You lot'll need pair of scissors to cut both the photo and the cartoon paper to size.
- Ruler – You'll employ a ruler to measure out the size of the drawing on your cartoon paper.
- Pencil Sharpener – Keep a pencil sharpener on hand. When working in photorealism on such a small scale, you'll demand to keep your pencils nice and sharp.
- Kneaded Safe – A kneaded rubber is a moldable eraser that is handy for erasing mistakes of all sizes.
If you make a purchase via the links beneath I receive a small commission, which helps back up this site.
And of form…
COLORED PENCILS!! – I prefer Prismacolor Colored Pencils over every other make, because they are highly-pigmented, lightfast, and professional quality. Basically, if yous want to depict photorealistically in colored pencils, so the quality of the colored pencils thing a swell deal. Lesser-quality colored pencils will yield less-great results, even if your drawing skills are superb. Then I wholeheartedly recommend Prismacolors for anyone who is serious almost their drawings.
I have the prepare of 132 Prismacolor Colored Pencils – and that means a lot of colors to cull from! For this drawing lesson, I picked through my set to notice the relevant colors and narrowed them down to these:

Don't worry, you won't need to buy all them though! I simply find that before starting a cartoon, it helps to split up the colors y'all might possibly need from the ones you lot definitely won't need, to reduce both the visual and concrete clutter of your workspace.
These are the colors I actually ended upward using:
-
White
-
Ruby Lake
-
Blue Slate
-
Blackness
-
Tuscan Red
-
Mediterranean Blue
-
Absurd Grey 10%
-
Poppy Red
-
Cloud Blue
-
Cool Grey xc%
-
Light Green
-
Non-Photo Bluish
-
Warm Grey xxx%
-
Jade Green
-
Denim Blueish
-
French Grey 50%
-
Celadon Green
-
Violet Blue
-
French Grey seventy%
-
Lite Aqua

Here is the photo we'll be working from (in a higher place). Click the image higher up and it will open up in a new tab or window. Y'all can then right-click and save it onto your figurer, then print information technology out. It should print out at ii inches past iii inches. Cut the image to size, so that the piece of paper is 2" x three".
Flip the paper over. Using your 6B or 8B pencil, scribble all over the back of the newspaper. Make sure the entire back of the paper is covered with pencil, like then:

Now, measure out a 2" x iii" rectangle on your drawing paper. Allow a one-half-inch to 1-inch margin on all four sides, creating a border around the rectangle, and cut the paper to size, like you see below.
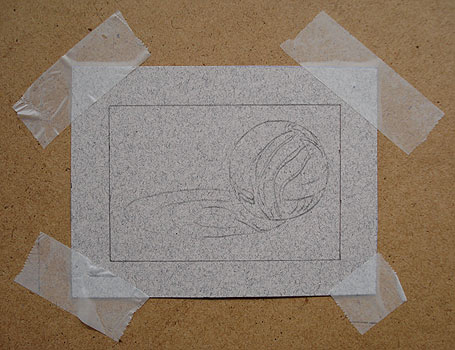
Identify the print-out of the marble photo within the 2" x three" rectangle. Use archival artist tape to record the print-out deeply onto the newspaper and also to tape the drawing paper securely onto the drawing board.

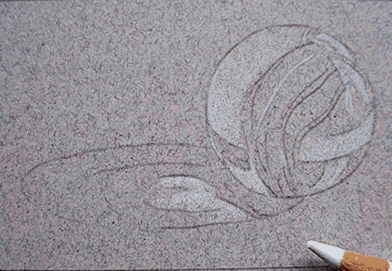
Using a sharp 2B pencil or mechanical pencil, trace the outline of the marble. You lot need to trace the outline, and all of the details such as different colors, highlights and shadows. Look at my tracing beneath to see how much detail I traced:

Be extra careful with tracing the marble, because the marble needs to be perfectly round to create a believable photorealistic drawing.
When you lot are washed tracing the image, carefully lift up the print-out to encounter how the outline looks. Leave at least one edge still taped down, and so that you can supersede the print-out exactly where it was if you detect that you missed a spot.
If it all looks good, remove the print-out.

Here's what your cartoon space should look like now:
(It's a good thought to record downwards your paper and so that it doesn't accidentally motility and crusade mistakes.)
When you lot work on your photorealistic colored pencil drawing, keep the digital image of the marble on your computer screen then that you tin can look at it as you lot draw. Likewise go on the print-out handy so you can reference it likewise.

Above you can see what my work infinite looked like as I created this photorealistic colored pencil drawing.
It's of import to keep your kneaded condom on paw because sometimes you volition need to lightly erase the graphite below drawing with your colored pencils. If you describe over the graphite with your colored pencils, you may inadvertently "set" the graphite into the paper, making it impossible to erase.

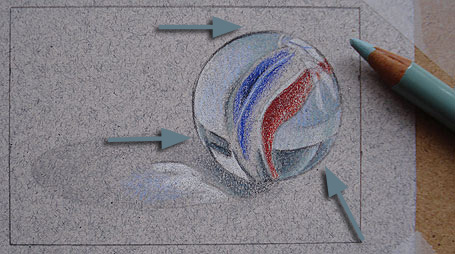
When working on a colored pencil drawing, I mostly always kickoff with the lights or the darks. In this drawing, I chose to start with the lights.
Place the light and white spots in the photo and use a gentle, light pressure to draw in the areas of lightness. It doesn't affair if the area isn't "pure" white – look for areas that are "generally light" and gently color them in with White. Working with colored pencils is a layering process, so you will draw other colors over the "more often than not light" areas later.

Use Denim Blue to lightly color in the diagonal blue strip in the marble. Call back to use a gentle touch!

I tape a small piece of scrap paper to my drawing board so that I can exam out colors. Many Prismacolor colors look akin, and then sometimes you'll need to test them to see the subtle differences and determine which one to use.

Use Scarlet Lake for the diagonal red strip that runs parallel to the blue strip.

Layer Tuscan Red over the upper edge of the Scarlet Lake to brand that role of the scarlet strip darker.
Add Blueish Slate on either side of marble every bit shown, and likewise a lilliputian scrap in the marble'south shadow.
Remember: if the exact color you need is non available or doesn't spring out at you, you lot'll need to draw several layers to create the color you need.

Identify the darkest areas and depict them in with Cool Grey 90%. Be conscientious when you apply dark colors, because they are difficult to erase. Add together them lightly.

Add more to the marble's shadow with Warm Grey 30%.
Jade Dark-green is an of import color for creating the sense of translucency in the marble. Add a touch of Jade Greenish to the summit, correct bottom and left bottom of the marble, as shown.

Add together more Denim Blue to the diagonal stripe in the heart of the marble.

Layer Not-Photo Blue over parts of the Denim Blueish in the marble'due south diagonal stripe.

Add together a touch of Mediterranean Blue to the diagonal stripe, to create more of a transition from lights to darks.

Cloud Blue adds luminosity to the marble. You lot might need to first pressing a bit harder at this phase, since by now you accept worked up several layers of colored pencil.
Add Cloud Blue to the skinny diagonal highlight that is within the marble's diagonal blueish stripe. For now, we can consider that diagonal blue area done.
Also add Cloud Blue to the marble'south other light areas.

Deepen the colour of the ruddy diagonal stripe past adding Tuscan Red.

Make the ruddy diagonal stripe more vibrant past layering it with Reddish Lake.

Add white to the lightest areas of the reddish stripe to create highlights.

Utilize Poppy Cerise for the final touch-ups in the diagonal crimson stripe. The diagonal cherry stripe is now done!

Add Light Green to the left and right sides of the marble to create a sense of translucency.
Utilize French Grey 70% to bring out the darker areas in the marble, every bit well as in the shadow. Don't worry if it seems too nighttime in some places – we'll lighten information technology up and smooth it out in the next step.

Apply Celadon Light-green over the French Grey 30% that you practical in the previous step in both the marble and the marble'south shadow.

Apply White over the Celadon Green. The Celadon Green created more than depth, and then adding the White will bring back more of the translucency. Be certain to add White on the bottom left part of the marble.
Past now, the surface of the paper feels slicker. All these layers of colored pencil have made the newspaper have less "tooth". You'll need to press harder, simply be careful not to press besides hard.

Add a hint of Light Aqua on the top and right of the marble. See how it'due south making the marble expect even more round and solid?

Apply Cool Grey 90% to the shadow and the marble'south darker spots. After that, go over the aforementioned areas where you applied the Cool Grey ninety% with another light glaze of Celadon Dark-green, which volition blend the Cool Grey 90% more smoothly with the rest of the marble.
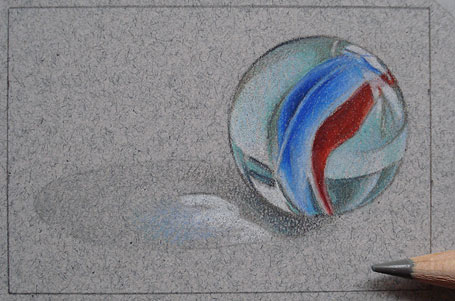
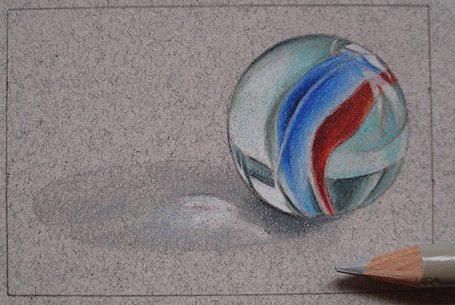
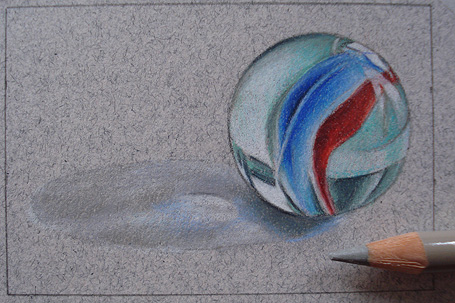
Congratulations: Now the marble is done! Time to stop the shadow:
Add together Warm Grey 30% to the marble'south shadow.

Employ Cool Greyness 10% to temporarily lighten the shadow. Adding Absurd Greyness ten% will essentially bring out some subtle highlights in the shadow.
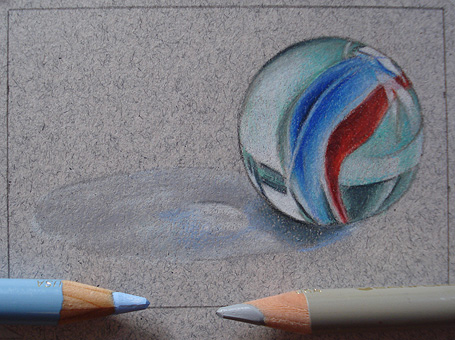
At present get over the shadow with another layer of Warm Greyness 30%, but leave some of the lighter areas in the shadow nevertheless showing.
Also, employ Blue Slate to add a touch of the marble's color to the marble.
Use French Grey 50% to add more of a warm darkness to the shadow.

Use Warm Gray 30% to gently lighten the areas in the shadow that were besides dark, and to darken the areas that are too light. In other words, you'll apply Warm Grey 30% to make the shadow appear more balanced, while still retaining some variance with lights and darks inside the shadow itself.

Congratulations!! You've simply drawn a photorealistic marble in colored pencil!
Here's the finished drawing:
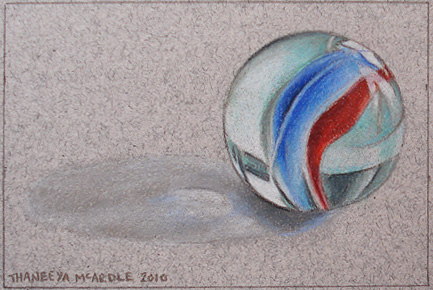
I used French Grey 50% to sign the cartoon. To keep the signature legible, I re-sharpened the colored pencil after every few letters.

I promise this realistic cartoon art lesson was helpful to you lot. Let it serve as a guide that helps you forth as you explore what you tin practise with colored pencils.
Equally you get more comfortable drawing with colored pencils, y'all'll surely come up with your own style of tackling drawings, from deciding where to start first to which colors to layer and when. There's no ready formula for success when it comes to drawing photorealistically with colored pencils.
The more yous work with colored pencils, the more you'll learn to do what feels right for each drawing.
Have fun!
Step-past-step colored pencil art lesson past Thaneeya McArdle
Let's Draw Course
If you liked this tutorial, bank check out my review of the Allow'due south Depict Course.
Information technology's a comprehensive video and ebook form that will teach y'all the fundamentals of drawing and gradually introduce advanced topics to assistance you draw whatever your imagination tin can invent!


Source: https://www.art-is-fun.com/how-to-draw-a-marble
Posted by: boedingtorned1980.blogspot.com
0 Response to "How To Draw An Art Pallet Step By Step"
Post a Comment